Christmas Card – Photograph Six

15636921473_2de5f5ee09_o

Camera: Canon 500D
Focal Length: 50mm
ISO: 100
Shutter Speed: 1/200
Aperture: f/1.8

I wanted to make my Christmas card photograph personal to myself. I think if I was going to send a Christmas card I made it would be personal anyway. I chose to photograph one of my four pet rats. This is Little One, he’s named Little One because we couldn’t come up with a suitable name and he was the smallest of the four, I think we meant to change his name, but Little One stuck. I love my rats, which a lot of people think is quite weird due to the stigma against them. They are beautiful, inquisitive and compassionate animals, not to mention their amazing intelligence. This year was Little One’s first Christmas and I think as a gift to myself, I want to prove how beautiful rats are. They’re not dirty, nor do they spread diseases. It’s quite ironic really, because those who say rats are filthy don’t seem to realise they live in the filth humans have left behind. I realise a picture of a rat isn’t all that christmasy. So I added in a bauble for him to play with while I photographed him. He was generally well behaved and easy to work with. Although his need for attention sometimes outweighed his need for a treat when his behavior was good.

I used a 50mm 1.8 in order to get that beautiful shallow depth of field. I pumped my ISO down to 100 to achieve no noise and I used a fast shutter speed as he is extremely fast if he wants to run away. I also used a flash gun to achieve the lighting and the dark background. Although there was some of the background visible, it was easily edited out in photoshop.

An Exploration of Movement – Photograph Five

16069275368_4f9c04eb23_o

Camera: Canon 500D
Focal Length: 75-300mm (300mm)
ISO: 400
Shutter Speed: 1/2000
Aperture: f/10

I absolutely adore this photograph. It was taken at Crosby Beach in Liverpool. Home to the Another Place sculptures by Antony Gormley. I decided to explore movement in the decisive moment. I spent roughly five minutes looking through the viewfinder in order to see in a different way. The light was absolutely breathtaking on this day and I think the copper coloured sky contrasts well with the industrial background. When looking through the viewfinder I took a mental note of what was happening within the frame. I noticed the family walking down the beach and the sculptures. I also noticed the industrial estate in the background. I framed them all within the shot and waited. Eventually a bunch of seagulls flew into the shot which is when I took the photo.

I set the ISO at 400 as I needed a fast shutter speed in order to capture the birds and because I was photographing hand held.. I set the aperture at f/10 to get the shot in focus. When I took the photo, I took a few in order to capture the birds. The one I have selected to submit was the best one. I feel like this has met the aims of the brief as it captures the flock of seagulls beautifully in the orange sky. The birds are clear because of the positioning of the frame, allowing them to move between the cranes and towers of the background.

The Inverse Square Law

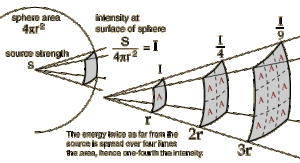
The inverse square law is the intensity of light from a constant source falls off as the square of the distance from the source. Any light source that spreads light in all directions, i.e. a lightbulb obeys this law. If you were to walk away from a campfire in the middle of a dark woods, it would get dark pretty quickly. Basically, the double the distance you are from the light, you quarter the light intensity. The light falls off 1 over the distance multiplied by itself. The light measured at 2 metres from the source will be half squared the intensity, if it was one meter it would be a quarter of the intensity. a light measured 4 metres from the same source would be a quarter squared or a sixteenth the intensity at one metre. In photography, as every stop means halving or doubling the light, a quarter of the light is two stops down and a 16th of the light is four stops down. A light reading of f/16 at 1 metre, for example would be f/8 at 2 metres and f/4 at 4 metres. The only light source that conflicts with this law is the sun, as the distance we move something on earth is quite trivial in comparison to the distance between the earth to the sun.

isq

What is Light?

Light is a gift in some photographic moments, and when light is presented, you must make the best of what you have. However, in the studio, you have full control of the light. I am researching the simple rules and guidelines to improvise my lighting skills and have a better understanding of the aesthetics I can achieve in the studio. I would rather learn from my mistakes, learn from lectures or even books and the internet than have poor quality lighting and ruining my images. Before taking my images or even brainstorming ideas, I feel that I need to understand lighting and build a relationship with it. Understanding the simplest of qualities, will help me understand how to bring out shadows, highlights, detail and saturation. I have chosen three books and various websites to give me the tools to develop my studio skills. As I am aware of photographic lighting, I have no real experience, though I have worked with lighting in moving image. This kind of lighting however, is different.

What is lighting?

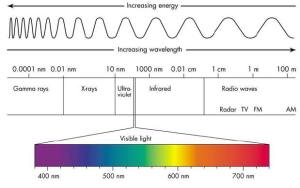
Scientifically, light is a narrow band of electromagnetic radiation, we can see it because the optic nerves are sensitive to these bands of radiation. There are no accurate boundaries to the range in which we can see light as individuals are different, but on average our eyes are receptive to a range of wavelengths between 400 – 700 nanometers.

Radient energy exists above and below the visible spectrum of light. Above the visible spectrum is ultraviolet and below is infrared. The digital revolution has allowed us to use technology such as photography and film, to pick up these colours and and convert them into a range of visibility.

em_spectrum

The Electromagnetic Spectrum

Photographers are typically interested in three physical properties of lighting – The wavelength/Frequency, the amplitude/intensity and the angle of vibration/polarization. The intensity of the light determines the brightness, the wavelength determines the colour and the changes of polarization are barely visible to the human eye, however these can be manipulated using polarizing filters.

Light causes shadows because it travels in straight lines, it is then reflected off a shiny surface like a mirror that reverses the angle of which the light falls. These simple laws allow the photographer to manipulate light to their advantage, using reflectors, mirrors and cutters. Light can also be refracted, meaning lenses can be designed to focus an image.

Light allows us to see colour, without it, the world would be colourless. For example, a green pepper only looks green if the corresponding wavelengths are present in the illuminating light. If an orange light that contains no green, falls over a green pepper, the pepper would appear grey and colourless.

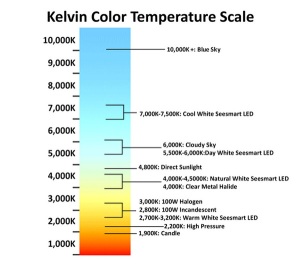
Light that contains all the colors of the spectrum is known as daylight, but photographers use this term precisely. White light comes from radiating sources, the sun, lightbulbs, flash guns etc. However there is some underlining connection with heat. Photographers use the theory of colour temperature, the theory wavelengths on the spectrum heating up to describe the exact colour of a lightsorce (tungsten, florescent etc.)

colortempchart_large-600x529

The Nomograph

A Vase of Flowers – Photograph Four

15924420552_f9c6b7685f_o

Camera: Canon 500D
Focal Length: 18-55mm (42.0mm)
ISO: 100
Shutter Speed: 1/250
Aperture: f/10.0

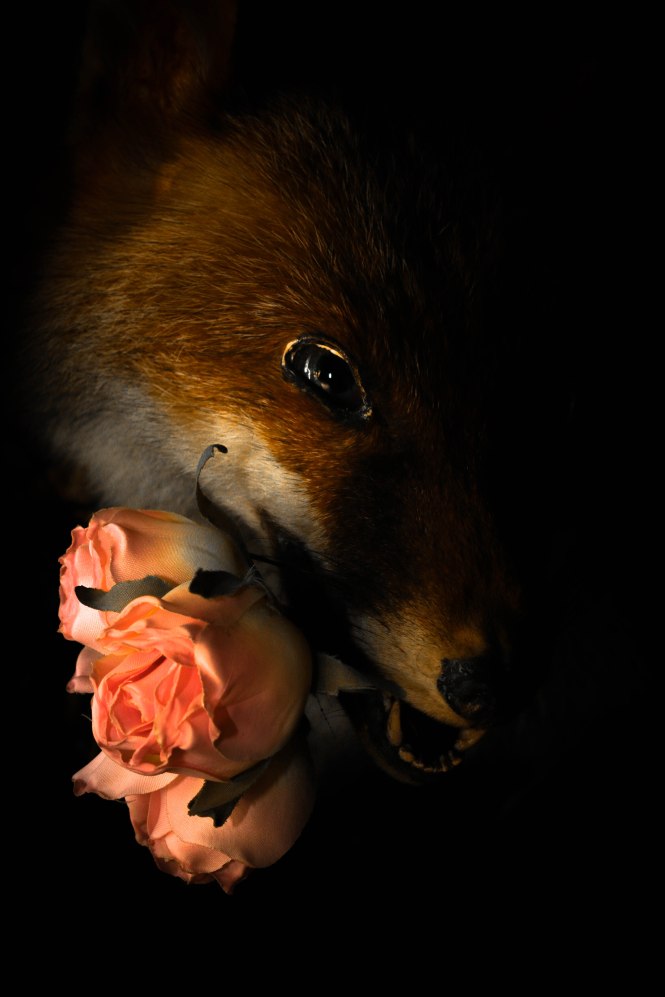
This is one of my favourite photographs from the module. I love how weird and wacky this photograph is and I feel that it is aesthetically beautiful. The subject matter was chosen due to how similar the photographs from previous years were. Although they were all different, the subject matter was the same. I chose this fox as my vase because I believe that all life is as important as the next. I also believe that it is fundamentally important that I spread this message in my photography. People seem to treat animals as objects and this is what I am trying to show. The contrast between faux flowers and the fox creates significant meaning. Though many people would see the fox as fake, it’s not. Or at least it wasn’t at one time. The flowers are not real and lack life, but the flowers didn’t have their lives taken from them. The fox however, did. The fact that this poor animal lost its life so that someone could mount it and use it as a decoration, is wrong.

To achieve this image, I pumped the ISO right down to 100 to maintain a sharp image with no noise. I used my kit lens (18-55mm) as I was quite close to the fox and I was uninterested in depth of field. I set my aperture at f/10.0 in order to keep it all in pin sharp focus, and the shutter speed is at 250th of a second to expose the image correctly. This image was also taken handheld, so a fast shutter speed allowed me to take the image with no camera shake. I achieved the exposure and lighting using my speedlite. I pointed the flash slightly above the frame allowing me to light one side of the fox’s face. This photograph allowed me to explore photography as a way to create meaning and express myself. This project allowed me to think outside the box and create something totally different.

Large Depth of Field Landscape – Photo Three

15821105722_3eb9ca2472_o

Camera: Canon 500D
Focal Length: 20mm
ISO: 100
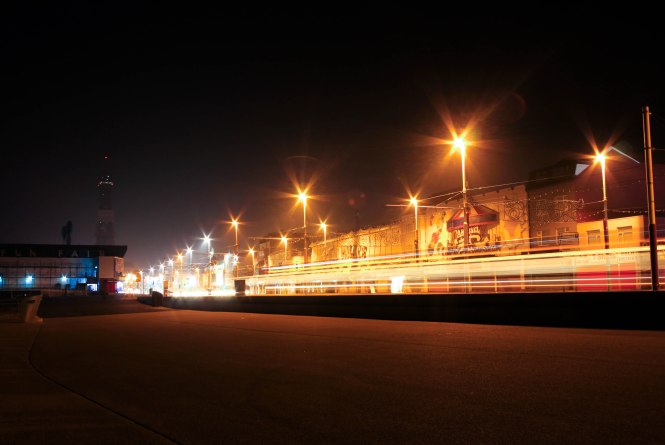
Shutter Speed: 10
Aperture: f/8

I really dislike this photograph, it reminds me of how disappointing this night was. My first aim was to capture the light streams of the Blackpool wheel on the north promenade. However, none of the lights were on. So I decided to pay around and try to capture something to show on peer assessment day. I feel though my photo is aesthetically terrible, I think I executed the technique rather well. I used a wide angle lens (20mm), I had a low ISO and a slow shutter speed. I also used a larger aperture to compensate the shutter speed. I did learn a lot from this photo, and most importantly I learned that photography can be quite unexpectedly disappointing. Peer assessment didn’t really go very well, not just for me, but for most. Only a few managed to use hyper-focal distancing correctly. We were given the chance to reshoot and things turned out much better.

15859591362_370a56b118_o

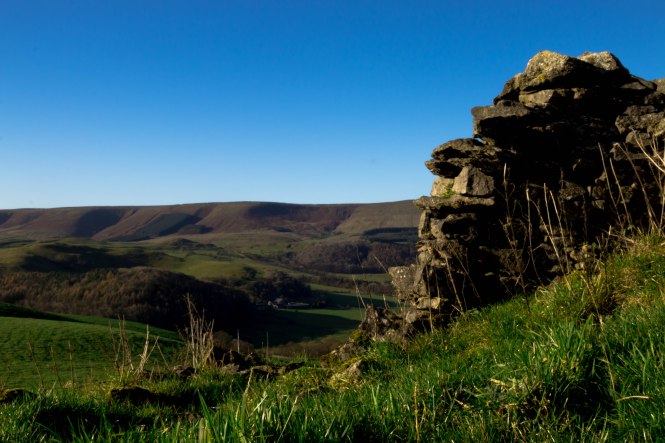
Camera: Canon 500D
Focal Length: 24mm
ISO: 100
Shutter Speed: 1/40
Aperture: f/22

I like this a lot more. I feel like I accomplished something in terms of aesthetics. This photograph was taken in the Trough of Bowland in the Ribble Valley. I looked back at my hyper-focal distance lecture notes and came prepared this time. I would have used a wider angle lens, but 24mm was the only one available. My ISO was pumped right down to 100, in order to achieve a pin sharp image. My aperture was set to f/22 in order to achieve a greater depth of field, allowing everything to be in pin sharp focus. And my shutter speed was set to 1/40 in order to expose my image correctly. I of course used a tripod for this image as my shutter speed is under 1/60. The use of a tripod, a bag of heavy stones and a shutter release remote allowed me to take the image with no risk of camera shake. I used the 24mm to focus hyper-focally without visually focusing as the brief tasked me to do. I chose this location due to the wall being in the foreground, the house in the mid-ground and the hills in the background. I chose the time of day at around 3:30pm as it was winter and would get dark early. My aim was to capture the light as the sun was setting, though I arrived a bit early and had to leave before the beautiful tungsten glow.

Shallow Depth of Field Portrait – Photograph Two

15422395440_381fb9f8a0_o

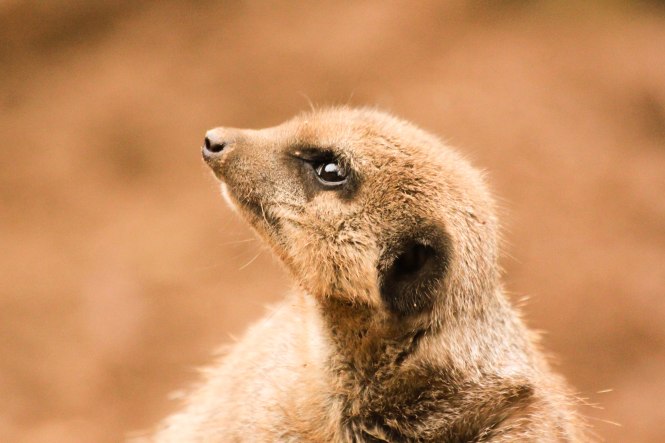
Camera: Canon 500D
Focal Length: 75-300mm (300mm)
ISO: 3200
Shutter Speed: 1000/1
Aperture: f/7.1

This portrait I had taken at Chester Zoo was taken on Shutter Priority. I wanted to explore the other features of my camera in order to gain more experience, knowledge and confidence when using my DSLR. I really like a lot about this photograph, I really enjoy photographing animals, in fact it is becoming somewhat of a passion thanks to Sebastio Salgado and his Genesis project. I love to photograph animals because of their innocence, and their lack of a voice, I really feel like this photograph captures this. His eyes for me, provoke an extreme amount of emotion and the way the light illuminates the shape of his body definitely adds to this.

 When I positioned the frame for this photograph, I had to be extremely quick due to meerkats moving around pretty much all the time. This is why I chose to use shutter priority. I wanted to capture the animals looking vulnerable as part of an ongoing project of mine and to do so, I felt that the shutter speed was the most important. I selected a fast shutter speed which in this case was 1000/1. I know now that this is rather an unnecessary speed, but at the time I was still learning how to use my camera. Due to my choosing of shutter priority, the camera selected the aperture for me. In this case, f/7.1. This being due to my focal length of 300mm. The aperture was about half open, allowing a beautiful shallow depth of field. The ISO was pumped right up to counteract the shutterspeed, giving me just enough light to correctly expose the photograph. Although, due to the high ISO, there is quite a lot of noise, but I feel as though it works well in this instance.

After a peer assessment, I was told that my photograph was a photograph of a Meerkat and not about a Meerkat, I would have to disagree, due to my own emotional response, but I am happy to take any criticism. So I reshot my Shallow Depth of Field Portrait.

16255975552_11a63f061b_o

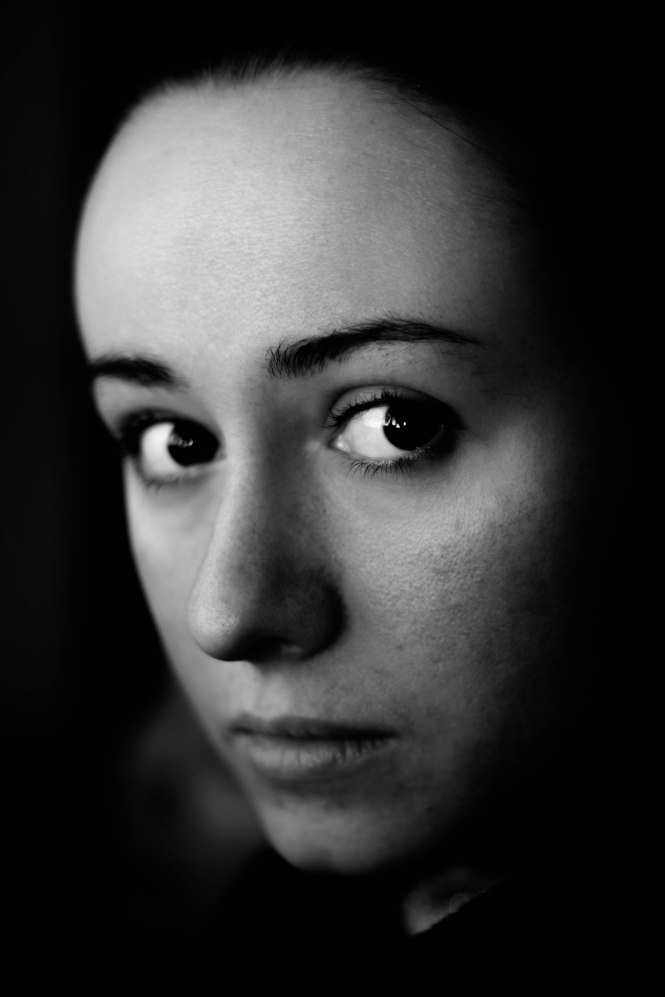
Camera: Canon 500D
Focal Length: 50mm
ISO: 100
Shutter Speed: 1/200
Aperture: f/1.8

Although I really like my Meerkat photo, I believe that this photo meets the brief much better. As you can see from my settings, my understanding of how to use a camera has drastically changed. I used a 50mm f/1.8 to achieve my shallow depth of field, I framed the shot quite beautifully, the light was achieved using a flashgun which compensated my fast shutter and my low ISO. I chose black and white for this photo because as I have grown as a photographer, I believe that black and white portraits bring out the soul, especially in the subjects eyes.

Exploration of Light – Photograph One

15309408568_3586bca204_o

Camera: Canon 500D
Focal Length: 75-300mm (235.0mm)
ISO: 1600
Shutter Speed: 1/15
Aperture: f/5.6

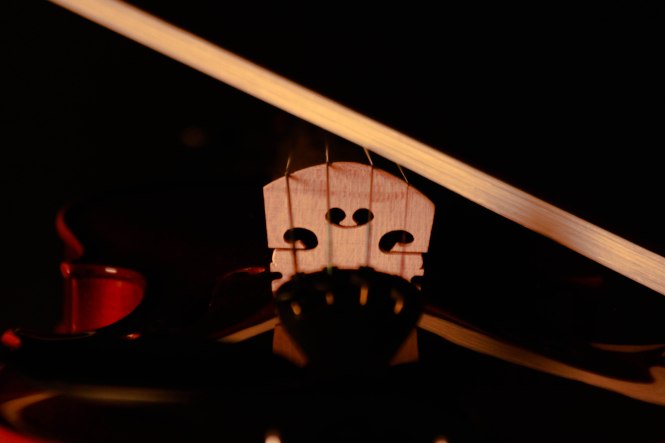
For this task I decided to take a photograph I initially had taken for my Objects Brief. This is a photograph of a violin and it’s bow. This photograph was taken in the studio because in order to explore light, I felt that I needed to control it. I used one Bowen light which was positioned in the bottom left hand side of the frame. Viola Diagram

This is a diagram of the studio layout when photographing this violin.

I was aiming to frame the shot in a way that was almost abstract, but still looks like a violin after a few seconds of looking. This is why I positioned the bow across the frame. I feel like my aim was not met, although the bow does its job of distracting the eye, the violin is clearly visible. In terms of lighting, I feel as though my aims were met. I wanted to capture the shape of the violin, but subtly, in order to meet my aims aesthetically. I really love the way the light from the soft box gently caresses the shape, softly illuminating its curves. This, however was done by complete accident. When photographing this object, I had very little knowledge and was unaware of the light horse hair of the bow, acting as a reflector.

 Overall, I believe that this image is quite poor, but in terms of my knowledge at the time, I think my experimentation and curiosity taught me quite a lot about lighting. If I could re-take this photograph, I world change the frame and the positioning of the violin. I believe that compositionally, the bow of the violin is more of an annoyance than a distraction. The position of the violin, especially on the left hand side looks off putting. I would more than likely change the lighting too, depending on the position of the violin. Although, Aesthetically I feel as though I have failed, I have learned a lot from this photograph, so because of that I think I have achieved an even higher goal.

Hyperfocal Distance

Picture Formats:

Landscape Rectangle – 2:3
Portrait Rectangle – 3:2
Square – 1:1
Panoramic – 6:17

Hyperfocal Distance

Hyperfocal Distance, to use this technique, work out your optimum focus point by a simple technique rather than vision focusing. To use hyperfocal distance, have a tape measure handy to measure the distance between the camera and the closest point of the image. Hyperfocal distance is the point of focus where everything from half the distance to infinity, falls into the depth of field.

Things I will need;

  • DSLR set to ISO 100, raw and manual.
  • Tripod that is weighted.
  • Remote or cable release.
  • Tape Measure
  • Step ladder.

No camera shake, foreground, midground and background must all be pin sharp.

An Exploration of Light

Camera Functions: 

  • Sensitivity, film or sensor.
  • Exposure mode (M,A,S,P – Nikon), (M,AV,TV,P – Canon)
  • Focus.
  • Compose, visualise and capture.

Taking a Photograph:

  • Film speed (light sensitivity) ISO, ASA.
  • Shutter Speed (time) seconds.
  • Aperture (Size of diaphragm) f-
  • Exposure reading/ check.
  • Focus (auto or manual)
  • Compose, frame and capture.

Shutter and aperture are inversely proportional which means that as you increase one you must incrementally decrease the other. These increments are what photographers call ‘stops‘. A stop can be aperture, shutter speed or ISO. i.e. 1/60 – 1/125 is equal to one stop. 400 ISO – 800 ISO is equal to one stop. F5.6 – F8 is equal to one stop.

  • At 200 ISO, F56 @ 1/125 is the same as f8 @ 1/60.

A photographer adjusts the ISO, aperture and shutter speed to suit the general light level.

  • ISO is set to suit the general light level.
  • Aperture determines the depth of field.
  • Shutter determines the capture of movement.
  • You decide what the priority is.

Aperture Priority is when you set the aperture you require and the camera selects the correct shutter speed. This is great for:

  • Portraits, where you want to control background sharpness.
  • Shots where you want to emphisise small detail.
  • Creating soft moods.

Shutter Priority is when you set the shutter speed you require and the camera selects the correct aperture. this is great for:

  • Freezing or blurring motion.
  • Capturing action.
  • Making sure you don’t get camera shake.

Programme is for when you just want ti snap away with little thought to settings.

Manual is when you have time to concentrate on accurate expire for maximized capture quality,